How To Drilling Holes In The Ceiling For Light? There are a few things you need to take into account when drilling holes in the ceiling for light. The most important thing is the weight of the light fixture. You don’t want to drill a hole that’s too big and cause the ceiling to collapse.
Another thing to consider is the material of your ceiling. If it’s made of plaster, it will be more difficult to drill through than if it’s made of drywall. Finally, you need to make sure there are no electrical wires or pipes in the way before you start drilling.
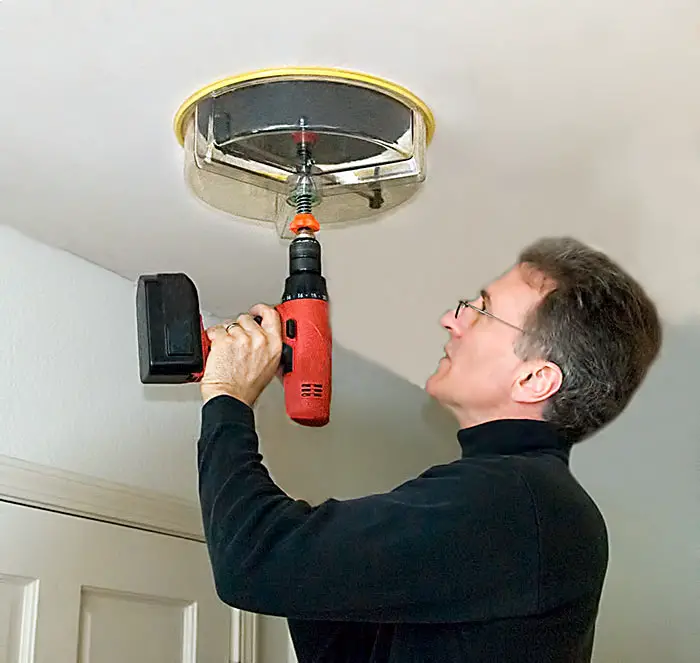
- Using a stud finder, locate the ceiling joists in the area where you want to install the light
- Mark the location of the holes with a pencil
- Drill pilot holes at each mark using a 1/8-inch drill bit
- Attach the bracket for the light fixture to the ceiling using screws and a screwdriver or drill
- Thread the wires for the light fixture through the bracket and into the hole in the ceiling
- Connect the wires from the light fixture to those in your electrical box according to the manufacturer’s instructions, then twist on a wire nut to secure them together
- Carefully push any excess wire back into the hole in the ceiling, then replace and screw on

Credit: www.youtube.com
How Do You Drill a Hole in the Ceiling?
If you need to drill a hole in the ceiling, there are a few things you need to take into consideration. The first is the type of material the ceiling is made out of. If it’s made out of plaster or drywall, you’ll want to use a spade bit.
If it’s made out of wood, then you can use either a spade bit or a hole saw.
The next thing to consider is where the hole needs to be located. You’ll want to mark out the location with a pencil so that you know where to drill.
Once you have your location marked, set up your drill with the appropriate bit and start drilling slowly. As you’re drilling, be sure to keep the drill bit level so that your hole is nice and straight.
Finally, once you’ve drilled your hole, clean up any debris that may have fallen down inside of it.
Then, screw in a wall anchor or two and screw your fixture into place!
How Do You Cut Holes in Ceiling Tiles for Can Lights?
If you’re looking to add some can lights to your ceiling tiles, there are a few things you’ll need to do in order to make sure the process goes smoothly. Here’s a quick guide on how to cut holes in ceiling tiles for can lights:
First, start by measuring the area where you want to install the can light.
Then, use a pencil or marker to draw a circle around the area on the tile.
Next, take a drill and create a pilot hole in the center of the circle. Once the pilot hole is created, insert a jigsaw blade into it and begin cutting around the perimeter of the circle.
When you’ve finished cutting out the hole, use sandpaper or a file to smooth out any rough edges. Finally, insert your can light into the hole and secure it in place.
How Do You Cut a Hole in the Ceiling Without Making a Mess?
There are a few ways that you can cut a hole in the ceiling without making a mess. One way is to use a utility knife to score the ceiling around the perimeter of the hole that you want to cut. Once you have scored the ceiling, you can then use a saw to cut through the scored line.
Another way to cut a hole in the ceiling without making a mess is to use an electric drill with a hole saw attachment. You can also use a jigsaw with a clean-cut blade to make straight cuts around the perimeter of the hole.
How Hard to Add Can Lights to Existing Ceiling?
Adding can lights to an existing ceiling can be a relatively easy process, depending on the type of ceiling you have. If you have a drywall ceiling, for example, then adding can lights will simply involve cutting holes in the ceiling and installing the fixtures. If you have a plaster ceiling, however, the process may be more difficult as you’ll need to locate the studs in order to properly secure the fixtures.
In either case, it’s always best to consult with an electrician before undertaking any electrical work.
The Punggol HandyMan: How to Drill Concrete Ceiling and Walls.
How to Cut Hole in Ceiling for Light Fixture
Are you looking to install a new light fixture in your home, but don’t know how to cut a hole in the ceiling for it? Don’t worry – it’s actually not as difficult as you might think. With a few simple tools and careful planning, you can easily cut a perfect hole in your ceiling for your new light fixture.
Here’s what you need to do: First, determine where you want the hole to be located. Then, using a tape measure, mark out the dimensions of the hole in the ceiling.
Be sure to double-check your measurements before proceeding. Next, use a drywall saw to cut along the marked lines. If you don’t have a drywall saw, you can also use a regular hand saw – just be extra careful not to damage any surrounding materials.
Once the hole is cut, it’s time to install the light fixture itself. Follow the instructions that came with your particular fixture (including any electrical wiring that needs to be done). Once everything is installed and working properly, simply enjoy your new light!
Hole Cutter for Ceiling Lights
Whether you’re looking to install a new ceiling light or simply need to cut a hole in an electrical outlet, having the right tool for the job is essential. A good quality hole cutter will make the task much easier and produce cleaner results. When shopping for a hole cutter, look for one that is made of high-quality materials such as steel or carbide.
The cutting edge should be sharp and able to handle different types of material, including drywall, plaster, and tile. Some hole cutters come with a built-in arbor (the shaft that holds the cutting blades in place), while others require a separate arbor that must be purchased separately. Most hole cutters have adjustable diameters, so you can choose the size that best suits your needs.
For example, if you’re installing a new ceiling light fixture, you’ll need a larger diameter hole than if you were just cutting a small opening for an electrical outlet. Keep in mind that the larger the diameter of the hole cutter, the more difficult it will be to control – so start with a smaller size and work your way up if necessary. Once you have your hole cutter ready to go, mark out the area where you need to cut using a pencil or chalk.
Then position the arbor over the marked area and start drilling slowly, applying even pressure as you go. If your hole cutter has removable blades, be sure to change them out frequently to keep them sharp and avoid damaging your material. When finished, clean up any debris from around the newly cut opening before proceeding with your project.
Installing Led Lights in the Ceiling
Installing LED lights in your ceiling is a great way to save energy and money. LED lights are more efficient than traditional incandescent bulbs, so they will help you reduce your energy bill. They also last much longer than traditional bulbs, so you won’t have to replace them as often.
Here are some tips for installing LED lights in your ceiling:
1. Choose the right size and style of light. There are many different sizes and styles of LED ceiling lights available, so make sure you choose the ones that will best fit your needs.
2. Follow the instructions that come with the light fixture. Every light fixture is different, so it’s important to read the instructions carefully before you begin the installation.
3. Make sure the area where you’re installing the light is clean and free of debris. This will help ensure that the light is installed properly and doesn’t get damaged during installation.
4. Use caution when working with electricity. Always turn off the power to the area where you’ll be working before starting any electrical work.
How to Cut a Hole for Light Fixture
Most light fixtures need a hole in the ceiling to install properly. If you’re installing a new light fixture, you’ll need to cut a hole in the ceiling so that the wiring for the new fixture can be run through it. Here’s how to do it:
1. First, find the center of the area where you want to install the light fixture. Then, using a pencil, draw a circle on the ceiling around this point. The size of the circle will depend on the size of your light fixture.
2. Next, use a drill to create pilot holes around the perimeter of your circle.
3. Once you have your pilot holes drilled, use a jigsaw to cut out the circle from the ceiling. Be sure to wear safety goggles while doing this!
4. Now that you have your hole cut, you can install your light fixture according to its instructions.
Conclusion
In order to drill holes in the ceiling for light, you will need a power drill, a screwdriver, and a stud finder. First, use the stud finder to locate the beams in your ceiling. Then, mark the spot where you want to drill with a pencil.
Next, insert the screwdriver into the chuck of the drill and tighten it. Finally, position the tip of the drill bit on your mark and slowly start drilling into the ceiling.

I’m John Carry, also known as a woodworker I have been a professional saw expert for over 10 years. I’d work with every type of saw machine out there, and experiment to find which tools work better.
I’m always looking for ways to improve my skills and help those around me. I love my job and am always happy to share my knowledge with others.